This tutorial was created by Redone on the original RealmCrafter Standard forums.
As the title states this is a tutorial on creating custom combat scripts using RC BVM scripting. I am not a pro at scripting and will never claim to be, and this post is just as much for me to learn as it is for anyone else who chooses to follow this topic. For this tutorial many screen shots will be from RC Pro, but everything will work for RC Standard 1.25. This script type seems to be challenging to a number of RC users for a few key reasons:
1) There are many unknown variables that are completely unique and different based on any given RC users project. 2) Using this script type forces you to create completely from scratch a numeric system that in its basic form allows your players and NPC meshes to animate, damage, kill or die, gain xp, gain or lose faction, all based upon the variables from above. A custom attack script also allows for numerous advanced AI functions depending upon your projects specific needs.
3) This is a script that generally intimidates some users because it removes the comfort of a built in system and plunges them into controlling the very heart of their projects combat system.
4) A good custom attack script can make, or break, a game.
There are many more
reasons but the goal of this tutorial is to demystify and guide scripters
towards gaining knowledge of and eventually scripting their own unique attack
script. This tutorial will start from the very basics and, hopefully, will go in
depth into the advanced uses that are possible in an attack script.
For the sake of the community and for the purpose of achieving this topics goals, please do not flame anyone that posts here, a secondary goal of this post is to get as many RC users as possible to participate in this topic to become familiar with BVM scripting (myself included). This is a diverse community with users of many skill levels, and what may seem to some as a seemingly worthless question by one user can appear to others as a very important question, i.e there are no stupid questions.
I urge anyone with questions, suggestions, ideas, answers, creative criticism, or anything of value to participate.
Redone's Basic Scripting Tips/Troubleshooting Section: I will be adding to this for current and future beginner scripters as I progress.
-It is essential to type out some lines of code to learn the basics of scripting. If you are unmotivated to type some script then I highly suggest you hire a scripter. If you always copy and paste other peoples script and simply change the values, I gaurantee that at some point you will need someone to fix your project. Copying and pasting does have it's purposes; in the beginning it gets you familiar to what script blocks look like, but you should formulate your own idea's at some point and translate them to script to gain full control of your project. For the purposes of this tutorial I will give you as much knowledge as I can to help you learn, but where possible I will use pictures of code instead of text. This is solely for your benefit.
- Always properly declare your variable types. If you do not, RC trys to guess what type of variable you are using, and it defaults to integer.
% for integers

# for floats

$ for strings
-You should group similiar variable declarations together. Player declarations should be grouped, Target declarations should be grouped, Damage declarations should be grouped, etc. , with the exception of Player and Target, these should always be your first declared variables in any RC script.
-You should be sure to declare Pure variables (Pure variables arent modified, such as "Damage = 10") above Formulated variables (Modified (mixed), such as "FinalDamage = Damage). This will solve many errors before they are even created. -Formatting your scripts properly is essential, this allows you and others to read and troubleshoot them.
-Large, complicated scripts are much easier to create if you plan them out heavily. List the functions you will need, then determine the variables you will use, and develop the functions into needed formulas and then script blocks one at a time to achieve your goal. This is the best way to create complicated, and working, scripts. This also allows you to isolate script errors easily. -Incorporate functions only when necesary, embedding them is preferred. If you incorporate a function and later need to revise it, you may find yourself rewriting the whole script, as opposed to only rewriting one function. -As we are working with variable numbers and functions, it makes perfect sense to let the calculator be your friend when planning, and can save you much time when results of a formula do not coincide with what you expected. -If things dont go as expected when you run your project, but you are sure your script is correct, try deleting both the npc spawn, and the player, and use new ones. This is sometimes necessary it seems, as we are changing things around the current actors and items can keep old settings.
-The line at the top of the default Attack.rsl that reads "You are responsible for applying any damage to the actor, but not for animating actors or blood effects" is incorrect. You will need to provide all of these functions when using the attack script.
Now, lets bust this custom attack script thing wide open!
First thing you will need to do is set up your GUE to use custom combat:

We will go slow at first, and build this script to a more complex form as we go. Ok, to make an attack script we first must develop a formula using actor attributes to determine 1)What is our damage potential 2) Do we hit or miss? 3)What happens if we or the NPC dies?
For the purpose of this tutorial we will use attributes that are Default in standard RC, and we will start very simple. If you choose you can add your own attributes and use them to formulate your own script. After all, in the end this script should be completely geared towards your individual project.
Part 1 - Developing and flow charting a basic combat system.[]
We first need some numbers (attributes) to use to make our system do what we need:
Strength - will determine our damage potential (later we will add weapon damage
as well, but not in this part)

Dexterity - will determine our potential to
dodge an attack

Speed - Will determine our potential to hit (later we will
make this more complicated, for now we will be simple.)

(we will add armor
to our system later as well)
So, using our simple variables, we now have a basis for a formula. As our damage
potential is easiest, we will start there:
Damage = Strength
Very simple indeed, and we will want much more to factor our damage for later -
but this will do for now.
Now, to state the conditions that determine either a hit or miss.
The factor that allows our target to dodge an
attack:
Dodge Chance = Targets Dexterity
And the factor that allows us to hit our target:
Attack Chance = Players Speed
Again, very simple and we will elaborate upon this as we go.
We now
have enough to flowchart a formula:
if player's attack (speed) is greater than targets dodge(dexterity), we hit for damage(value of our strength), otherwise we miss
Very basic, and slightly unfair to all involved in the fight, but we do in fact
have a basic system charted.
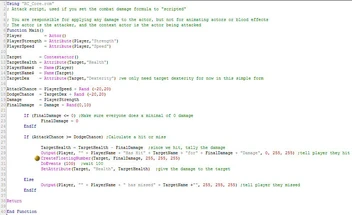
Part 2 - Assembling our formula into a script.[]
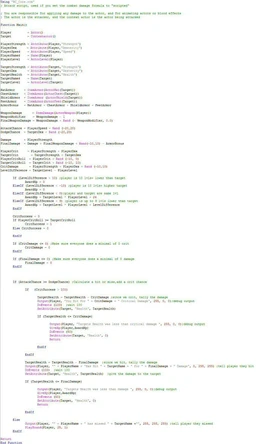
Now that we have a formula we need to get it into a script. At the very top of the script we must declare our variables. One key to good script is having all variables clearly defined. We need the basics, so we add the essentials first, to our file
"Attack.rsl":
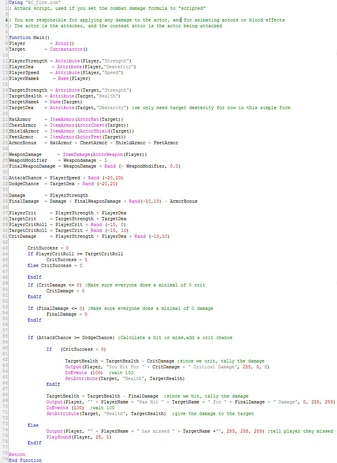
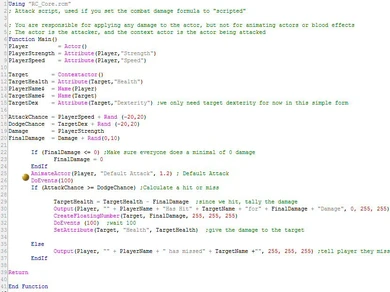
Using "RC_Core.rcm"

; Attack script, used if you set the combat damage formula to "scripted"


; You are responsible for applying any damage to the actor, and for animating actors and blood effects

; The actor is the attacker, and the context actor is the actor being attacked

Function Main()
We now declare our variables:
Player = Actor()

Target = Contextactor()
The above declares the attacker and the target. Player and Contextactor should always be defined clearly in scripts, with little exception.
TargetHealth = Attribute(Target,"Health")

PlayerName$ = Name(Player)


TargetName$ = Name(Target)
Every fight needs at least two combatants, right? Also, we only need (for this part of tut) our targets health, as this is a two way script (the npc runs this script as well during battle and the player is the target). We use the name declarations to debug, and to tell us our damage(until we add floating damage numbers).
Next, we will need to declare our combat formula factors:
PlayerStrength = Attribute(Player,"Strength")

PlayerSpeed =
Attribute(Player,"Speed")

TargetDex = Attribute(Target,"Dexterity") ;we only need target dexterity for now in this simple form
Now that the core attributes are declared, we declare variables for our chance to attack, the targets chance to dodge, and the potential damage:
AttackChance = PlayerSpeed

DodgeChance = TargetDex

Damage = PlayerStrength
Ok, so we declared. Now lets make the formula. First, a note on damage. It sounds mundane, but, we must insure that at least "0" damage is made by everyone:
If (Damage <= 0) ;Make sure everyone does a minimum of 0 damage

Damage = 0

EndIf
Now that we have made sure everyone has a damage potential of at least 0, and not less, we formulate our combat idea.
Pseudo code:if player's attack (speed) is greater than targets
dodge(dexterity), we hit for damage(value of our strength), otherwise we
miss.
Script formula:
If (AttackChance >= DodgeChance)


TargetHealth = TargetHealth - Damage


Output(Player, "" + PlayerName + "Has Hit" + TargetName + "for" + Damage + "Damage", 0, 255, 255)

DoEvents (100)

SetAttribute(Target, "Health", TargetHealth)


Else Output(Player, "" + PlayerName + " has missed" +
TargetName +"", 255, 255, 255)

EndIf
I added outputs for debug purposes. Later we will add visual floating numbers so we can see the damage in combat.
We now have a very limited working attack script, that uses very little to accomplish it's goal. The damage is exactly equal to the players strength attribute. The script does not animate combat yet, this will be covered in another lesson. In fact what we have is a very limited system that barely functions and needs enhancing to make it worth its weight in copper
If you have
been following along word for word, your script should now look something like
this:

Part 3 - Randomizing the formula just a little.[]
We will add one more aspect for this part, we will add a random factor to our variables. Later we will add new attributes to our combat formula, but first we will learn how to randomize what we have.
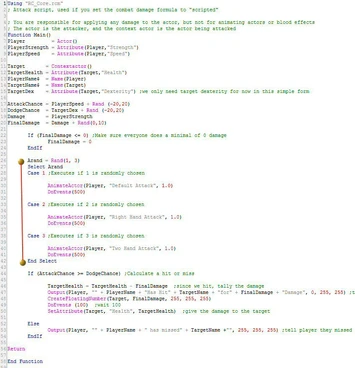
Declare a new variable, FinalDamage at the top, just below the line "Damage = PlayerStrength":
FinalDamage = Damage + Rand(0,10)
Then replace all instances of the word "damage" within the If statements to "FinalDamage". This will add 0 - 10 extra Damage, varying each time. If you change the random calculation to reflect a negative value, such as FinalDamage = Damage + Rand(-10,10), it is possible to allow the attacker to create less damage than their beginning damage potential.
Now edit the declarations "AttackChance = PlayerSpeed" and "DodgeChance = TargetDex" to the following (or experiment with your own random formula):
AttackChance = PlayerSpeed + Rand (-20,20)

DodgeChance = TargetDex + Rand (-20,20)
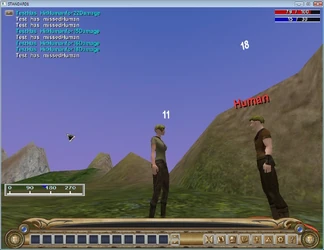
If you have been following along, your script should now look something like this:

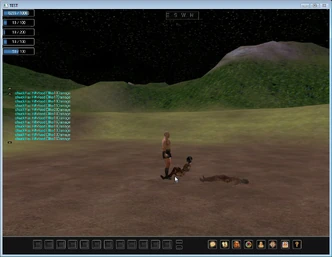
We now have a little more variety to work with, and gives both attacker and target a fighting chance (pun completely intended).
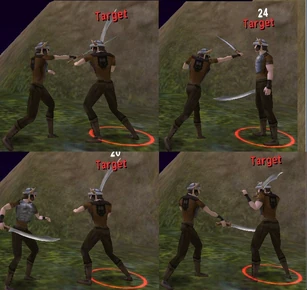
And now a screenshot of this very simple script working:

Part 4 - Adding armor and weapon bonuses to our formula.[]
Now that we have actors that are damaging one another in combat, we will add 2 more factors to our original formula, weapon damage and armor bonus. First, lets declare some new variables for our targets armor bonus.
Directly above your declare statement "AttackChance = PlayerSpeed + Rand (-20,20)" add these armour variables:
HatDef = ItemArmor(ActorHat(Target))

ChestDef =
ItemArmor(ActorChest(Target))

ShieldDef = ItemArmor (ActorShield(Target))
FeetDef = ItemArmor(ActorFeet(Target))
The ItemArmor command reads the armor level value that you set in GUE when you create the item.
Now we will add them together to get a total armor bonus value by declaring this below the individual armor item variables:
ArmorBonus = HatDef + ChestDef + ShieldDef + FeetDef
We can now use the value of ArmorBonus to lessen the damage potential of our formula. Next, we will add weapon damage to enhance the damage potential by declaring the following above our Damage declaration:
WeaponDamage = ItemDamage(ActorWeapon(Player))
The ItemDamage command reads the damage value that you set in GUE when you create a weapon. Used directly, the damage potential is always constant.
THIS STEP NOT REQUIRED BUT IS USEFUL
TECHNIQUE: We can enhance the damage span of weapons further by using a
controlled random value to produce a range of the damage. For instance, if you
want a weapon set to 5 damage in GUE to have a damage potential of from 1 to 5,
you can add 2 more declared values to achieve this.
To span the range of the damage potential using a controlled random value, declare these variables above the FinalDamage declaration. If you do not need this feature, leave it out of your formula:
WeaponModifier = Weapondamage - 1

FinalWeaponDamage = WeaponDamage + Rand (- WeaponModifier, 0.0)
And then change your "FinalDamage" declaration to use the FinalWeaponDamage modifier:
FinalDamage = Damage + FinalWeaponDamage
We will now add the ArmorBonus value to our FinalDamage factor for use:
FinalDamage = Damage + Rand(0,10) - ArmorBonus + WeaponDamage
NOTE: In this formula, if a target has more armor than the damage potential created, the target will not be able to be damaged, so be sure to set your armor level and weapon damage values in GUE with this in mind. We will add a critical hit factor that will bypass the armor variable to address this problem directly in the next step.
So far your script should be close to this:

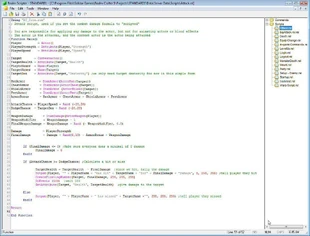
Part 5 - Developing and implementing a Critical Hit system to enhance the formula.[]
This system will be completely distinct from our main formula, and it will use different factors than the main formula to determine crit success, targets block chance, players damage potential, and any modifying variables. We need to declare different attributes for use in this seperate system.
In your own unique project you can of course develop this into the main formula if you choose, but for this tutorial it will be a seperate system, embedded within the main combat formula. This allows us to modify our critical hit system later without having to recalculate the main formula.
Declare your new variables near the others at top:
PlayerDex = Attribute(Player,"Dexterity")

TargetStrength = Attribute(Target,"Strength")
We can now declare our variables that will be the basis of our new system, again at the top with the others:
PlayerCrit = PlayerStrength + PlayerDex

TargetCrit = TargetStrength + TargetDex

PlayerCritRoll = PlayerCrit + Rand (-10, 0)

TargetCritRoll = TargetCrit + Rand (-10, 10)

CritDamage = PlayerStrength + PlayerDex + Rand (-10,10)
We will now formulate the players chance to hit critical versus the targets chance to dodge, using a simple If/Else structure:
CritSuccess = 0

If PlayerCritRoll >= TargetCritRoll

CritSuccess = 1
Else CritSuccess = 0

EndIf
Place this block directly below your declarations. We can declare CritSuccess here in place because we will only use it here.
As we have a new damage potential, we need to again insure that this potential is at least 0 in value for both player and target, so again we add this check to the script, directly below our CritSuccss block:
If (CritDamage <= 0) ;Make sure everyone does a minimal of 0 crit
CritDamage = 0

EndIf
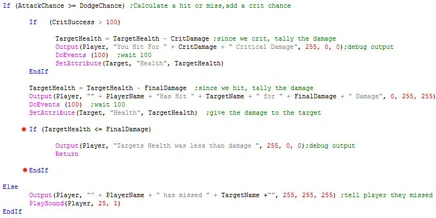
Now we create our formula, as we did with the main formula, and we script it into an If statement:
If (CritSuccess > 0)


TargetHealth = TargetHealth - CritDamage


Output(Player, "You Hit For " + CritDamage + " Critical Damage ", 255, 0, 0)

DoEvents (100)

SetAttribute(Target, "Health", TargetHealth)


End If
This is a seperate utility to inflict Critical damage, but we want to embed this If statement into our main hit/miss block. This ensures that a player must first hit normal to gain a chance to hit critical. If this block was embedded outside of our main hit check a player could miss, and crit at the same time. This may be useful for some projects, you can experiment with this some to see different results.
NOTE: As you look at this new formula, you will notice that it bypasses the armor bonus value. This is a useful, but slow way, to resolve situations where the combatants are stalemated. The script is now ready to deal with all combat situations.
Your script should now be layed out similiar to this example:

Part 6 - Actor death, experience point rewards, death scripts and simple AI.[]
NOTE: For this next section you will want to have working Player death, Monster death, and levelup scripts in your project. I will provide some basic examples in the post directly below the tutorial.
To this point we have learned how to implement the basics of controlled
combat using script, but we have still relied on
RC to kill the actors, and to use It's predetermined deathscripts. We will now
take complete control of the system.
It is now time to incorporate Player and Target levels to our formula, and to develop a system to reward players with Experience points (XP from here out), and to direct the results of a death to a second (and sometimes 3rd and 4th) script, for use in advanced techniques such as controlling and assigning a Targets loot drops to the Targets killer.
There are a lot of ways to achieve these goals, and we will go through many of the significant ways. We will start with ways to reward XP once a target is dead.
Preparation: We now will embed an If statement to check whether or not the target has died into our AttackChance statement. Embedding here will ensure that the Target will only be killed if the player hits.
Add the following lines directly into your Attackchance statement:
If (TargetHealth <= FinalDamage)


Output(Player, "Targets Health was less than damage ", 255, 0, 0);debug output

Return


EndIf
This statement simply checks to see if players damage dealt was larger than the targets health. If the FinalDamage was greater than TargetHealth, we now have isolated a death condition for use in our formula. Notice that we do use the Return command in this statement; If the player is dead the script will now end.
Your AttackChance statement should now resemble this example:

We will now use this new statement to explain a few of the different ways to reward players XP after killing a target.
XP Section I: Allowing XP to be auto calculated by using the GiveKillXP command[]
We can use RC's internal XP formula to auto calculate our XP reward value for us by using the GiveKillXp(Player,Target) command. The command reads the XP multiplier that you set in GUE when you create your actors, and rewards the player by using the Target's XP multiplier value:
If (TargetHealth <= FinalDamage)


Output(Player, "Targets Health was
less than damage ", 255, 0, 0);debug output

GiveKillXp(Player,Target)


DoEvents (50)

SetAttribute(Target, "Health", 0)

Return


EndIf
Using the GiveKillXp command will reward Xp to the killer using RC's internal XP formula, which is based on level.
We use the SetAttribute(Target,"Health",0) command to ensure that the actor is dead and the script goes to the Return(without it, you may get two or more xp rewards, and the actor may not stop fighting although it is technically dead).
The script will now produce results like the following based on the Xp multiplyer you set when you added your Actor(s) in GUE:

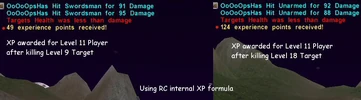
This is the easiest way to reward XP, but is less configurable to your projects unique needs than using the GiveXp command.
XP Section II: Assigning XP value using the GiveXP command.[]
Using the GiveXp command we can assign XP reward points geared towards our unique project, using a system to specify exactly how much XP to reward for a kill. To do this we will use a level based formula to calculate our XP, so we will need to declare 2 new variables to use, at the top near our other declares.
Place this line directly below your existing declared target variables:
TargetLevel = ActorLevel(Target)
Place this line directly below your declarations block, below the other variables:
AwardXp = TargetLevel * 10
Now to use our Xp formula instead of allowing RC to calculate , change the script to the following:
If (TargetHealth <= FinalDamage)


Output(Player, "Targets Health was
less than damage ", 255, 0, 0);debug output

GiveXp(Player,AwardXp)


DoEvents (50)

SetAttribute(Target, "Health", 0)

Return


EndIf
Using this formula, the Xp awarded will always be The Targets level times 10.
XP Section III: Assigning XP value using the GiveXP command using level conditions.[]
We can further control our Xp reward by creating a system of conditions that will help determine our Xp value, using a level span to reward players that are fighting targets that are close or slightly higher in level, and not reward players that are fighting targets that are out of their appropriate level range. We will now declare our players level, and the level difference of our player and target for use in this system.
Place this line directly below your existing declared player variables:
PlayerLevel = ActorLevel(Player)
Then add the following declare below all of the other declares:
LevelDifference = TargetLevel - PlayerLevel
We can now use the difference between PlayerLevel and TargetLevel to calculate our Xp value. For this tutorial, we will use a formula that punishes players who attack targets that are 10 levels higher or lower, will reward heavily players who attack up to nine levels higher, and humbly rewards players who are fighting targets that are the same level. This system also ensures that the Xp will not be less than 25 each if the target is the same level as player.
We will achieve this using an If statement to check our targets level difference to us. You may also want to experiment using the select command structure to do this, as it would also work very well for this purpose.
Delete the variable AwardXp = TargetLevel * 10 we used in the last step, and add the following formula directly below your top variable declares:
If (LevelDifference > 10) ;player is 10 lvls+ lower than target


AwardXp = 0


ElseIf (LevelDifference < -10) ;player is 10 lvls+ higher target


AwardXp = 0


ElseIf (LevelDifference < 0);player and target are same lvl


AwardXp = TargetLevel * PlayerLevel + 24


ElseIf (LevelDifference < 9) ;player is up to 9 lvls lower than target


AwardXp = TargetLevel * PlayerLevel + LevelDifference


EndIf
You can use a much more detailed system for your own project. This system enables you to even spell out the Xp reward for every level difference, you would just need to add more checks to it for every condition you wanted Xp set precisely for.
Using the above formula, you could easily assign Xp based on Faction,Monster type (by name or tag, for a boss monster possibly), weapon type, Zone, etc. You would simply need to declare the variables you wanted to use and add the conditions to the if statement, or create new if statements to further test extra conditions. The possibilities are only limited by the variables available in RC, your projects specific needs, and your creativity.
Note: If you have been following close,
you may have noticed that only the main attack block will actually provide a
condition of "dead". So far we haven't added this feature to our critical hit
system. To add this to our Crit hit system so that actors can die on a critical
hit, and players are awarded Xp on a critical, we need to copy, adapt, and embed
the death check within our critical hit system (remember, it is a seperate
system).
Using the script example below, you can see how I duplicated this same system to check if target has died to my critical hit system:

For this tutorials purpose we will use the above described system for our death and XP needs.
Deathscripts: Who killed who? Adding seeds of AI.[]
Up to now we have relied on RC's internal workings to launch a seperate script
to handle the condition of death. This is ok if you will never need to know who
killed who, parameters that you can pass to other scripts so they can utilize
the target and the killer for their purpose(s). We can take full control of this
as well however, now that we have scripted our own death condition into our
attack.rsl.
As with our other systems, we have a few choices in the way
we can pass the value of player and target to external scripts. The examples in
this section can be scripted to into separate systems, so you can use a
combination of ways using separate death conditions (i.e. use one way in main
formula, use another in critical hit formula). They can also be scripted to
different conditions of one formula using a check system.
We can also
create different results for both Player and NPC actors.
PREPARATION: It is
now time that we enable the script to determine whether the combatants are
controlled by a human (player actor) or by the server (NPC actor). This will
allow us to start incorporating simple AI into our formula.
For logic
purposes it will now become very essential that the scripter clearly knows who
the player (the killer) and who the target (the killed) is, because we will
start to pass these values to other scripts for use now.
We will declare
a new variable to determine if ActorIsHuman:
PlayerIsHuman = ActorIsHuman(Player)
As this is a pure variable it should be declared directly under Player and Target at the top of the script.
If the player is human, the result of this variable will be the value 1. If the actor is an NPC, it will return a 0. Using this value we can now make different events occur based on if the player or target are human controlled actors or NPC characters.
Death Script I: Using the KillActor command to use an assigned death script.[]
To use an assigned death script for your target, and pass the player and target variables to the death script for use, we can use the KillActor command. This will allow RC to autocalculate the faction increase or decrease after a kill, and will autocalculate and distribute the Xp value of a kill if used in conjunction with the GiveKillXp command.
If the target is an NPC this will pass the Player (the killer) and Target (the killed) values to the script that was assigned as its death script in its spawn point, and if the Target was a human player, the Player and Target values will be passed to the default player death script, "Death.rsl"
Consider the following example:
If (TargetHealth <= FinalDamage)


KillActor(Target,Player) ;pass Target and Player to assigned death script

DoEvents(50)
GiveKillXp(Player,Target) ;auto assign Xp and Faction hit


Return


EndIf
Death Script II: Using the ThreadExecute command to call an external death script.[]
By using ThreadExecute we can call external scripts for use, and pass the commands parameters to them for use. This can be effective for many purposes. For example, our XP calculation formula could be called and used from an external script, because we can send the value of the target and player to a seperate script that can then pass the XP value to the actors.
For now, we will use this method to call a deathscript from our Attack.rsl.
Consider this code snippett:
If (PlayerIsHuman = 1) ;If Killer is Human

If (TargetHealth <=
FinalDamage)


GiveXp(Player,AwardXp) ;give our formulated Xp
DoEvents(50)

SetAttribute(Target, "Health", 0) ;used with GiveXp, when NOT using KillActor

DoEvents (500)

ThreadExecute("MonsterDeath", "Main",
Player, Target, 0) ;Call MonsterDeath to handle the kill

Output(Player, "Targets Health was less than damage ", 255, 0, 0) ;debug output

Return


EndIf

Else
By using this technique we can easily call different death scripts for different monsters, by setting up a system using attributes, or by using the monsters unique class to call different scripts when our death condition was meant.
You of course would need to prepare your script for this using newly
declared variables, and for the purpose of this tutorial we will only discuss
it.
The script snippett below clearly shows this technique in action:
If (PlayerIsHuman = 1)

         If (TargetHealth <= FinalDamage)


            GiveXp(Player,AwardXp)

            DoEvents(50)


            SetAttribute(Target, "Health", 0)

            DoEvents (500)


            If (MonsterType = 1)


 ThreadExecute("MonsterDeath", "Main", Player, Target, 0) ;death script for regular mobs

            ElseIf (MonsterType = 2)


 ThreadExecute("BossDeath", "Main", Player, Target, 0) ;death script for boss mobs

            EndIf

            Output(Player, "Targets Health was less than damage ", 255, 0, 0) ;debug output

            Return


    EndIf

      Else
Death Script III: Calling different Death Scripts for NPC and Player[]
Using the variable we added in the beginning of this section, we can now reliably call different death scripts for NPC's and Players. We will incorporate a simple If/Else check in our death condition. In your own script you can use an elaborate system to achieve this, but for this tutorial a simple check is sufficient.
Consider the following example:
If (PlayerIsHuman = 1) ;Killer is human

         If (TargetHealth <= FinalDamage)


            GiveXp(Player,AwardXp)


    DoEvents(50)

            SetAttribute(Target, "Health", 0)


    DoEvents (500)

            If (MonsterType = 1)


 ThreadExecute("MonsterDeath", "Main", Player, Target, 0) ;death script for regular mobs

            ElseIf (MonsterType = 2)


 ThreadExecute("BossDeath", "Main", Player, Target, 0) ;death script for boss mobs

            EndIf

            Return


         EndIf


      Else ;Killer is NPC


         If (TargetHealth <= FinalDamage)


            KillActor(Target,Player)


            DoEvents(50)

            GiveKillXp(Player,Target)


       DoEvents (500)

            Return

         EndIf

      EndIf
NOTE: You may have noticed that this example only specifies deathscripts for NPC actors.
Although it is possible to call different deathscripts for player actors as well, this can easily confuse the engine if not done very precisely. Using the KillActor command ensures that the values of target and player iare passed to the default player death script, Death.rsl.
You can easily incorporate a system into your Death.rsl to handle varying death actions for different player actors, and is in my opinion a much more effective usage. However, this topic may be elaborated upon once I open the advanced discussion portion of this thread, to guide scripters that choose to use this method.
It is also more efficient to have one single "monsterdeath" script, and incorporate and utilize functions to call the various death actions. This will help you once you have many monsters in game, you will only need to locate and edit one central file to control the various results for all of your monsters.
This can be achieved with the Death.rsl as well, but differently. Functions are of no use in Death.rsl, its entry point is always "main", so you would need to add formulas to check the player type instead of using functions.
Incorporating simple AI: Adding Basic AI to our formula.[]
Human controlled actors need no AI (Artificial Intelligence). They are capable of making decisions such as when to attack, when to heal, when to call other players for help, when to cast a spell, when to move out of the way, when to run, or when to stop attacking.
NPC actors must have scripting to emulate this uniquely human behaviour. RC scripting utilizes some commands that are very specific to AI. In the preparation of the previous section, we learned about the ActorIsHuman command. We will now learn some other related commands that we can use if our Human check tells us that our actor is an npc (ActorIsHuman = 0)
ActorCallForHelp - This command causes all NPCs with a faction rating of over 90% with the specified actor's faction, who are also within range of the actor, to join in attacking the actor's target.
If (TargetHealth < 15)

      ActorCallForHelp(Target)

   EndIf
The above example would be embedded into your Hit success block, and would make the target call surrounding NPC actors that are in good faction to it for help if it's health dropped below 15.
Using a random value would make it do this only sometimes, to emulate an actor who was able to call for help versus an actor that was killed before the call for help could go out, as this example shows:
If (TargetHP < 25)

Arand=Rand(1,2)

Case 1


ActorCallForHelp(Target)

Case 2

Output(Player, "" + TargetName$ + " tried to call for help but failed", 255, 0, 0)

End Select

EndIf
ActorAIState and SetActorAIState[]
ActorAIState(Actor, State) SetActorAIState(Actor, State) ActorAIState is
a command that uses RC's hard coded NPC states. The states are as follows:
AI State Values
The ActorAIState command returns the current AI mode of an actor. There are various possible states:
0 - Wait in current position, attack any valid targets who come into range
1 - Patrol - walk to destination, then set destination to new waypoint if available
2 - Run - same as Patrol but running instead of walking
3 - Chase and attack target
4 - For actors who are paused at a waypoint while on patrol
5 - Pet mode - actor will follow leader and attack leader's target (actor MUST have a leader to use this)
6 - Pet attack mode - actor is chasing and attacking the leader's target
7 - Pet wait mode - actor waits in current position and doesabsolutely nothing
Consider the following example, from the RC documents:
;Give an NPC a boost if it is attacking

         State = ActorAIState(Actor())

         If (State = 3 | State = 6) ;if actor State is 3 or 6

            SetAttribute(Actor(), "Health", Attribute(Actor(), "Health") + 20)

         EndIf
ActorTarget and SetActorTarget[]
ActorTarget(ActorHandle) SetActorTarget(Actor, [TargetActor])
ActorTarget is used to determine 1) does the actor have a target, and if
so 2) what is the Target. Using SetActorTarget you can manipulate the actors
target by switching its target to another valid target, or setting it's target
to 0 so it no longer has a Target. This can be very useful in the Attack.rsl,
and can be used for various AI results.
USAGE: When we enabled the script to call external death scripts, you may have noticed that the NPC may begin attacking the player even after it killed it, immediately after the player respawns after death. This is because the engine now expects us to control the AI state for our NPC's. Before it was using RC's internal system to handle this, but we have bypassed the default settings. We can use SetAIStae and SetActorTarget to control this result.
Consider this example:
If (PlayerIsHuman = 1)


 GiveXp(Player,AwardXp)

                  SetAttribute(Target, "Health", 0)


                  DoEvents (500)


 ThreadExecute("MonsterDeath", "Main", Player, Target, 0)


 Output(Player, "Targets Health was less than damage ", 255, 0, 0) ;debug output


                  Return

               Else


 GiveXp(Player,AwardXp)

                  SetAttribute(Target, "Health", 0)


                  CreateFloatingNumber(Target, AwardXp, 255, 255, 255)


                DoEvents (500)

                  SetActorTarget(Player, 0)


                  SetActorAIState(Player, 1)

                  Doevents (60000)

                  SetActorTarget(Player, 0)


 Return

               EndIf
In this example, if the Target was a human player, we change the NPC's target to 0, stopping it from attacking the player any further, since if the script ran to this point, the player is now dead. We then set the NPC's AI state to 1, which will make the NPC patrol waypoints, for 60 seconds (60000 clicks). We then set the NPC AI state to 0, which is the default state and means that the NPC will stand there and attack any new valid target that gets to close to it.
This effectively stops the battle on a player death.
ActorAggressiveness[]
ActorAggressiveness(Actor)
This command reads the actors aggressiveness that is set in the actor setup in GUE. We can not use this value to change the aggression of an actor, but we can get it's value, and use that value to make our script react differently to actors based on their aggression level. The
aggression values are as follows:
0 - Passive
1 - Defensive
2 - Aggressive
3 - Non-combatant
Consider this example of usage from the documents:
AggLvl = ActorAggressiveness(Actor())

         Output(Actor(), "Your aggression level: " + AggLvl)
Part 7 - Adding floating damage numbers and particle emitter effects to the battle[]
Note:I have found one issue regarding floating damage numbers and RCPro: RCP would not create floating numbers for me. This is yet uncomfirmed, but if you are using Pro and get a client crash from this command we may have to wait for another release to use it in pro
We are now ready to implement floating numbers to the combat which will allow us to see visually on screen both players and targets damage. This is not essential for your combat script, and you do not need it if your project plan does not use them.
We will add a line directly above our line "DoEvents (100) ;wait 100" contained within our if statement:
CreateFloatingNumber(Target, FinalDamage, 255, 255, 255)
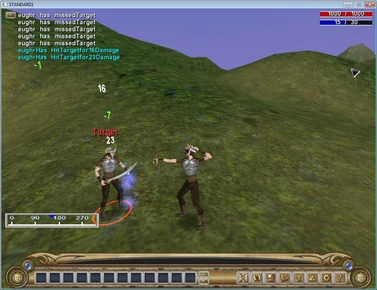
This will create a floating number of our FinalDamage variable given to the target(s) on screen during combat, in white. If you have been following along your script should now look something like this:

NOTE: Once you have the floating numbers working in your script it is no longer necesary to have the text outputs that we added in the beginning sections, and you can remove them at this point if your project won't use them. We used them to debug our script, but we now can see the damage with floating numbers.
Save your changes, if you are using 1.25+ launch your GUE and build your project, if you are using pro just build your project. Launch your server, unlock it, launch your game and go battle an enemy to test. If you have done it right your combat will look similiar to this:

=== Attaching a blood emitter to the target when
hit.
===
To attach a blood emitter (or any particle emitter you like) to your actors when they are hit, we will use the command CreateEmitter (Target, "EmitterName", TextureId, Time). Place the following command within your Hit check If statement block, directly below where you want it to occur.
I place my CreateEmitter commands directly underneath my floating number commands:
CreateEmitter(Target, "Blood", 12, 1000)
This will attach a blood emitter to the target for 1 second (1000 clicks) everytime it is succesfully hit. You can of course use a longer or shorter time, or a different texture or emitter.
Part 8 - Animating your combatants.[]
At this point we are ready to animate the combatants so they visually represent the battle on screen. For the purpose of this part of the tutorial we will use default animations that are standard to RC default models, but if you like you may use your own custom animations and or models.
To simply use one animation for all combat types, we only need to add 2 lines to our script, directly below your first EndIf statement:
AnimateActor(Player, "Default Attack", 1.2)

DoEvents(100)
We will elaborate on this and create a system that will choose our attack animation based on our weapon type in a few steps, but for now your code should resemble this:

And if you enter battle, the fighters will now be animated with one combat animation:


We are now going to turn our limited combat script into a fully functioning attack.rsl, using some advanced scripting techniques and commands.
Part 9 - Animating your combatants using the Select command.[]
In this part we will implement random attack animations using the Select command and structure. First, locate the lines of script we added in the previous section:
AnimateActor(Player, "Default Attack", 1.2)

DoEvents(100)
and remove them. Starting at that same place we will make a new script block that will contain our select command and its structure.
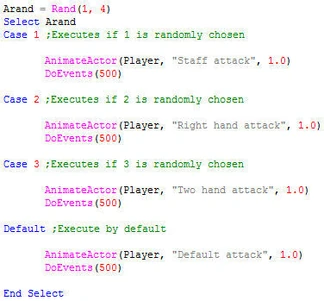
First we need to declare a new variable, Arand. We do not need to declare this variable at the top of the script with our other declares because this variable will be used only here, for our select structure, so we add it in place in the script:
Arand = Rand(1, 3)
Next we add the select command:
Select Arand
Now we need to set up what will be executed when the script calls for the value of Arand, using the Case command:
Case 1 ;Executes if 1 is randomly chosen


AnimateActor(Player, "Default Attack", 1.0)

DoEvents(500)


Case 2 ;Executes if 2 is randomly chosen


AnimateActor(Player, "Right Hand Attack", 1.0)

DoEvents(500)


Case 3 ;Executes if 3 is randomly chosen


AnimateActor(Player, "Two Hand Attack", 1.0)

DoEvents(500)
NOTE: The value at the end of each AnimateActor command, "1.0" controls the speed of your animations playback time, and the value from the DoEvents command controls the wait time until the script animates the actor again. Experiment with these settings to fine tune the speed of your animation. This will not however control the speed of the actual battle formula.
Once we have all of our animation choices in place, we close the select
structure:
End Select
You can have as many choices as you like in your select structure. If you have been following along your script should now resemble this:

This adds much more realism to our attacks. Your combat should now resemble this:

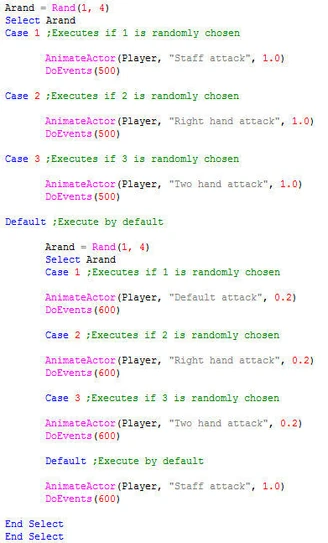
The above added script block chooses an attack animation completely at random, but we can set a default attack animation and combine it with the random selection by adding this line directly above your End Select command:
Default


AnimateActor(Player, "Default attack", 1.0)

DoEvents(500)
Then change your command of Arand = Rand(1, 3) to reflect the new choice:
Arand = Rand(1, 4)
This will allow for some basic normality to the animation chain. Your select block should now resemble this:

We can elaborate this step further, by embedding another select block within our current select structure, underneath any Case command or Default command. For this tutorial we will vary our attack animation playback speed using this technique, and we will place our second select structure within our Default choice.
Erase the contents under your default choice, copy your entire Select structure from the top to bottom, and paste it underneath your main structre's Default choice. At this point you can experiment with decreasing or increasing the values for your new select blocks animation playback and DoEvents wait time.
For this tutorial I have set my animations playback to 0.2 and increased the wait time between animating by 100 for the new select block.
If you have been following, your script should now resemble this:

We now have what appears to a game player to be some simple AI in regards to combat. Although it is random at this point, using these techniques we can control the randomness some.
In the previous section we learned how to add random animations using a Select command structure, and we learned to use the Default command as a basis for our overall animation formula.
In this section we will learn how to utilize this structure to completely and accurately control all of our combat animations and sounds, using a system we create based on the class of weapon that your player is using.
It is in this section that you will also learn how to animate your ranged attacks using the default RC models.
Part 10 - Animating your combatants based on weapon type.[]
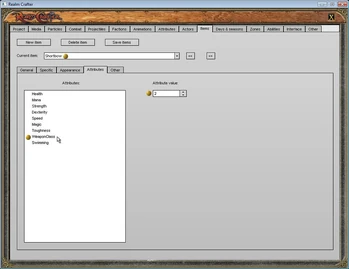
Preparation: We first need to prepare our project to use the system we are about to develop. Open your project, locate the attributes tab, and create a new attribute, WeaponClass.This is what we will name our new attribute for this tutorial, but you can name it appropriately for your project if you like.
If you haven't already done so, import some weapon meshes into your project and then use the gubbins tool or armoury tool to position them to your actor(s). Once you have these in your project properly, create new items, weapons, and set them up completely, i.e Scimitar, 15 kg weight, 150 copper value, damage of 15, one handed, slashing etc, etc. Do this for a variety of weapon types.
NOTE: The Fire Bow and Fire Crossbow animation frames for the default RC models are not included in the default animation sets. You will need to add the following animations to your Player (male) and Player (female) animation sets for the (New) actors, and use a different animation set for the (Old) actors
Bow and crossbow animation range for default actors (New) Human, elf, gnome, dwarf,
elf:
Fire bow - 755 - 810
Fire crossbow - 812 - 900
Bow and crossbow animation range for default actors (Old) Dwarf, Barbarian, Elf, Human, and LizardFolk:
Fire bow - 818 - 940
Fire crossbow - 818 - 940
Open the Items>Attributes tabs and select your new attribute. For each weapon
that will use the same animation types, set the attribute to the same value.
I will use the value 2 for all of my bow type weapons, and any bow that
I add later will use the value 2 for their WeaponClass attribute, i'e all 1
handed weapons will use the value 1, all two handed weapons will use 3, etc.
You of course can use other values but they need to begin at 1 and up, in succession. The number 0 will be reserved for our unarmed combat, as default.

In your script, we will now need to declare our new variable, at the top of your script just below your other declared variables. We will declare this with the others this time because this can be a multiuse variable that you may use in other formulas:
AttackType = ItemAttribute(ActorWeapon(Player), "WeaponClass")
Now we move to our Select block, locate the line that states Arand = Rand(1, 4) and delete it. Then just below it be sure to change the line that reads Select Arand to:
Select AttackType
Now, look over your animations defined in your Select block, and adjust the corresponding Case commands to define the appropriate animation for your WeaponClass, i.e Case 1 has the animation command to trigger 1 handed sword animation, and your 1 handed sword uses the value 1 as its WeaponClass.
If you have been following, your script should now resemble this:


Remember that you can embed select structures within other select structures, and at this point you should experiment with this technique to create very unique variations for your projects combat animation needs.
Now we know reliably where to place our combat sounds, we just need to place the correct sounds with the correct animations for our weapon type.
If you have an arrow projectile and emmiter setup, you now can add the command FireProjectile(Player, Target, "Arrow") directly above the DoEvents command within the script block you defined your Bow and Crossbow animations in.
If you run your project your combat should
resemble this:

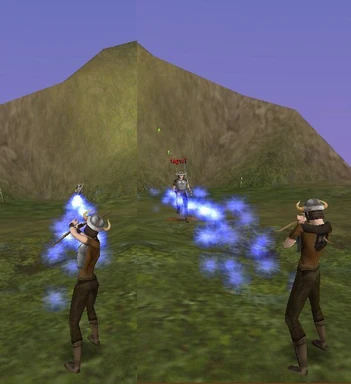

NOTE: If your projectile is set in GUE to create damage, it will be added to the combat damage, as demonstrated by the green floating point damage numbers in the screenshots above. If this is not a result that your project requires, you can set the projectiles damage and or chance to hit to 0% in GUE. Also, the range setting is functional as well, so be sure to set the range of projectile weapons directly in the item setup properties in GUE.
Special Thanks Go To NBT for introducing me to this type of use with a select structure.
Part 11 - Adding some combat sound to the mix.[]
This next section discusses adding attack and hit sounds to what we have so far. There are many ways to do this using if statements or utilizing yet another select structure, but for this tutorial we will use the select structures that we have in place to quickly add varying combat sounds to go with our varying combat animations.
You will need to import custom soundfiles to
your project at this point, and document the media ID numbers for them to take
full use of this step.
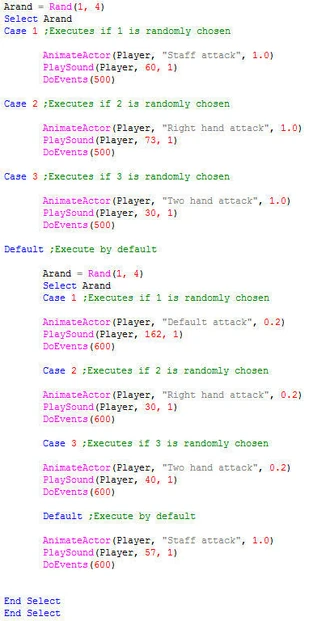
We will add a command directly above each DoEvents in our Select commands:
PlaySound(Player, 162, 1)
We place it above the DoEvents because otherwise the sound file would be affected by the delay. This may be useful to some, if you want to fine tune the exact moment during your animation that a sound is played.
The first factor in the command is the media ID and sets which sound file is played, the second factor determines if anyone can hear the sound besides the player. If this factor is set to 0 then only the player will hear the sound, and no one else. This could be useful if you have sound files that give players personal messages, such as "way to go" or "critical hit".
We can also add a Playsound command near the "player has missed" dialog output. This can be used as a universal miss sound.
If you have been following your select block should now resemble this, but with your specific media ID numbers in place:

We now have animated combat that we can hear based on a default setting with random variables.