Taken from the RealmCrafter: Standard documentation.
Welcome to the Realm Crafter Engine Game Editor Tutorial and Documentation. The Game Editor (GE) is the most valuable tool in the library of Realm Crafter tools, it allows for complete editing of your zone content, creation of actors, items, and many more Massive Multiplayer Online Role Playing Game (MMORPG) content creation.
The GE does not do everything. There are terrain, rock, tree, dungeon, and various other editors which are available for use with the Realm Crafter Engine. The GE works well with these tools for a complete set of game creation tools.
This document is designed to show the basics of all the workings of the GE, with out overwhelming you with advanced options. Once you have completed this document you will have an understanding of the workings of the GE, which will allow you to use the GE in more advanced ways.
Use of the GE in Realm Crafter[]
At first glance, the Game Editor may appear to be a bit intimidating. While there are a lot of tabs, each with specific number information, name, settings, and more, it is not a tool that is confusing. Where to start and what exactly to use is the goal of this document.
One important aspect to the Game Editor is to realize that it is the most powerful tool in the Realm Crafter Engine. This is the entire mechanics and engine call out system. Meaning basically that this is the tool that dictates how fun and involved your game is as well as how unique your game is.
Before you really jump into the Game Editor there are several important factors you should have in place. Know what skills and abilities will be in your game, how they will work, and most importantly, how they will affect players, NPCs, and items. If you start randomly creating and editing information you will run into issues. Game making is not quick and easy, it takes time and patience.
The main reason I have stressed the last point is that no one wants to have a game that is over or under balanced (to hard/easy or not fun). If you have little or no experience in designing mechanics, there are a huge number of PnP (Pen and Paper) games on the commercial and independent market that show their statistics and mechanics for skills and abilities. They include Dungeons and Dragons™ (D&D™, AD&D™, and D20™), Warhammer 40k™, and various White Wolf© systems. Do not copy them, but use the information as a guide. You will not regret the time spent designing a worthwhile mechanics system.
There is one free to use mechanics system called Action Systems at http://www.goldrushgames.com/start/modules.php?op=modload&name=Downloads&file=index&req=viewdownload&cid=4 this is a free system (please read the legal documents and make sure you follow them) it is a very good system comparable to the D20 system but in some ways a bit more detailed.
You will notice that the Game Editor is made up of several tabs. Each tab controls an exact part of the game engine. It is important to know which tab controls what aspect of the engine. Most are straightforward, but some are more generalized because they cover so many different aspects of game design.
Abilities Tab[]
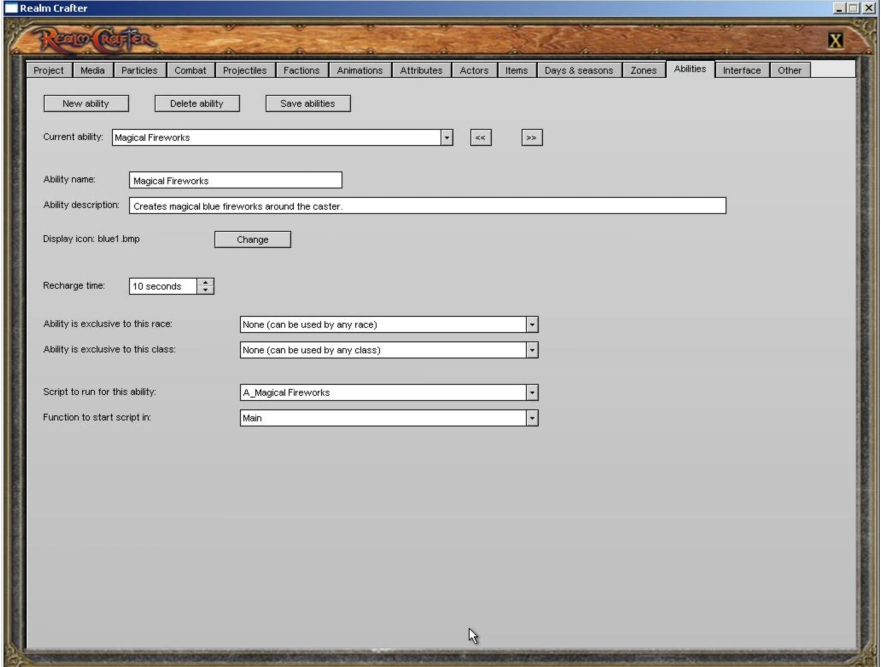
The abilities tab is for giving players the ability to have specific skills such as natural healing, tracking, etc. This tab allows for naming of the ability, selecting new, deleting, and saving.
You can also select the ability icon, change the recharge time between uses, select which races, and classes can use, and the actual script that will be used when the ability is selected.
Abilities can be almost anything, because of the scripting required for the ability to work. So you will have much freedom to explore different abilities for your races and classes.
Actors Tab[]
The Actors tab is where you set up everything from description, attributes to the model being used by the actor in the game. There are many tabs inside this actual tab, and each one has many options.
Actors are the monsters, non playable characters, and anyone else that is not directly a player. Actors use the same attributes and skills that your players will use. They can use the same weapons and equipment.
Any model or mesh can be set up as an actor. Any actor can be set up as a mount. The actual number of actors is limitless, but you are restricted to five different appearance settings per actor. You can create a new actor, which acts the same as the other actor and uses the same model, to expand the number of actors with a different look, but it will have a different name overall.
One of the nice aspects of the Actors GUI is that you can complete an actor, and create a copy file of the actor. Simply changing the name, and small adjustments later, you have quickly created a similar actor. This saves a lot of time due to the large number of settings possible for each actor.

| Main Actors Tab GUI | Effect on GUI |
|---|---|
| New Actor | Create a new Actor. |
| Copy Actor | Copies the current actor and creates a new copy of (original name) for editing |
| Delete Actors | Deletes the current actor |
| Save Actors | Saves all the actors |
| Current actor pull down | Shows and allows for selecting of the actors that are available |
| Double left arrow | Previous actor |
| Double right arrow | Next Actor |
| Actors Tab - Description Sub Tab GUI | Effect of GUI |
|---|---|
| Actor Race | Set the Race of the Actor |
| Actor Class | Set the Class of the Actor |
| Actor Description | Give a description of the Actor |
| Genders | Select the gender of the actor, or give it no gender |
| Home faction | Select the default faction for the actor |

|
Actor Tab – General Sub Tab – GUI |
Effect of GUI |
|
Attack Range |
Set the attack range of the actor |
|
Aggressiveness |
Sets the default action for the actor, such as always attacks, non combatant etc |
|
Trade Mode |
Select if the Actor can be a merchant, pack animal or is not a trader |
|
Environment Type |
Select the Actors environment, if it will fly, walk, swim. |
|
Start Area |
Select the starting zone for the actor |
|
Start Portal |
Select the name of the portal where the actor starts |
|
XP multiplier |
Select the multiplier amount to the xp given to the killer of the NPC |
|
Actor is playable – Check Box |
Select if the actor is playable by a GM |
|
Actor can be ridden – Check Box |
Select if the actor can be ridden as a mount |
|
Male animation set - |
Set which animation set to be used by the actor if they are male |
|
Female animation set |
Set which animation set to be used by the actor if they are female |
|
Male sounds |
Which sounds will be used by the actor if male |
|
Female sounds |
Which sounds will be used by the actor if female |
|
Change and None Buttons |
Change or Select None for the sounds |
|
Inventory Slot – Pull Down Box |
Select the inventory slot type the character uses |
|
Inventory Slot – Disabled Check Box |
Disable the inventory slot |


|
Actor Tab – Appearance Sub Tab – GUI |
Effect of GUI |
|
Change – Male/Female Body Mesh |
Change the Actors Mesh (Model) |
|
Pull Down Box (1st to 5th) |
Change default look for one of five default overall looks for the Actor |
|
Change – Hair Mesh |
Change the Hair Mesh Used |
|
Change – Face Texture |
Change the look of the face texture |
|
Change – Body Texture |
Change the body texture |
|
Change – Beard Mesh |
Change the mesh for the beard |
|
Change - Gubbin Mesh |
Change the Gubbin set to be used for the actor |
|
Change – Blood Texture |
Change the texture when blood is drawn on the actor in combat |
|
Actor Scale |
Change the size of the actor |
|
N button |
Select NONE for the specific appearance area |


|
Actor Tab – Attributes Sub Tab – GUI |
Effect of GUI |
|
Attributes Text Box |
Shows all the attributes in the game |
|
Attribute Value |
Give a value to the attribute for this actor |
|
Attribute maximum |
Set the absolute max attribute setting given to this actor, so spells, buffs do not over power it |


The Last Tab is the Preview Tab. This area shows the actor in full 3d, fully textured, with all GUBBINS so you know how it will look in the actual game.
The actor can be rotated by clicking on the preview and moving your mouse.
Animations Tab[]
Animation Tab allows for setting up of all the animations used by the actors in the game world. This is for selecting the animation set, selecting where the animation is in the model, name of the animation, and adding new animations, or removing them if need be.
The actual animation frames number in the thousands, which is important to note. Since changing the animation frame numbers in a set will have an effect on the look of characters that use that set.


|
Animation GUI Button or Options |
Effect of GUI Option or Button |
|
Save Animation Sets |
Save all the animation sets in the game |
|
Animation Set List Box |
Shows all the different animation sets available in game. |
|
Rename Set |
Rename the animation set you have selected to another name |
|
Animations in Set |
Shows the names of all the animations in the selected set |
|
Rename Animation |
Renames the selected animation in the currently selected set |
|
Animation Start Frame |
Sets the very first part of the animation to be run when the actor performs the required action |
|
Animation End Frame |
Sets the very end part of the animation so the actor ends his movement properly |
|
Copy Animation Set Button |
Copy the Current Animation Set to a new Set |
|
New Animation Set Button |
Create a new animation set |
|
Remove animation Set |
Removes the currently selected animation set from the game |
|
Add animation |
Adds a new animation for editing |
|
Remove Animation |
Removes the currently selected animation |
Attributes Tab[]
Attributes Tab is one of the most important parts of your games mechanics system. Since this is where you add the default attributes the game will use. Each attribute or skill created here can be placed on anything in game.
Attributes and Skills are completely separate entities in the Realm Crafter Engine. Attributes are considered Intellect, Strength, Stamina, etc. Skills are considered fletching, tracking, blacksmithing, and more.
This area is another section of the GE which is recommended that you have a game mechanics system planned out before hand. While full editing is available later on, small changes are easier then changing 100s or 1000s of items, stats, and actors attributes.


|
Attributes GUI Button or Option |
Effect of GUI Button or Option |
|
Save Attributes Button |
Save all of the Attributes |
|
Attributes List Box |
Shows all of the skills and attributes that are in the game |
|
Rename Attribute |
Change the name of the attribute |
|
Attribute is a skill check box |
Select if the attribute is actually a skill such as foraging or gun smith not an attribute such as strength or intelligence. |
|
New Attribute Button |
Create a new attribute |
|
Remove Attribute Button |
Remove the currently selected attribute |
|
Assignable Attribute Points Available at Character Creation Scroll Box |
How many points the player can distribute between the attributes for their character |
Combat Tab[]


The combat tab is for creating your combat types and mechanics. How they will be used with different attacks, melee or ranged (Weapon, Gun, Bow, Spell, etc), is all created here. There are 20 different damage types you can create for your game. But each one would affect an entire type of attacks or weaponry such as blunt or pierce.
The combat options area is where you can change the combat delay, damage to weapons and armor, the combat formula for how combat will work, where the number shows the damage and if there is a faction change after the kill.
Advanced combat mechanics do require some scripting knowledge, but there are a few normal MMORPG combat mechanic systems already in place for you to use.
Day & Seasons Tab[]
The Days and Seasons Tab is for how the world will change as players experience your world. From Year Length, Time Compression in the game (i.e. 5 minutes real time for 1 hour in game time), the current year in game, the current day in game, number of months and their name, as well as number of days. Sun and Moons are also determined here, when they come up, in which season, and how they look.
There is also season control for selecting different seasons, how long they last, when daylight and dusk happen. Full editing of the names of your seasons to how long they last is available.
Factions Tab[]
The Factions tab is the political system for the game. These will be all of the factions used in the game, and you can have up to 50 for the Realm Crafter Standard. You can also set default faction settings between other factions, for sworn enemies, neutral or allies.
Since factions play such an important role in the development of story and overall feel of a game, a great deal of thought should be put into their function in the game and their reactions to each other.
One of the best games for factions and their interactions is Sony Online’s Everquest™ www.everquest.com. This game has thousands of factions, each reacting with each other in special ways. But Everquest II™ only uses a total of 48, much more streamline with better results.


|
Factions GUI Button and Options |
Effect |
|
Save Faction Button |
Saves all the factions |
|
Faction list box |
All of the factions in your game are shown here |
|
Rename Faction |
Rename the currently selected faction |
|
Adjust rating with this faction |
When a faction is selected you can set the faction rating with another faction, selected from the pull down |
|
This factions rating with this faction |
Shows the faction rating with the other faction |
|
Default Rating |
Sets the default rating for all players at creation if they are a certain faction type. 100% to -100% (Ally to at War). Fighting may happen at anytime between +25% to -100% with trading happening with any faction but scripting can add situational control to each encounter. |
|
New Faction |
Create a new faction |
|
Remove Faction |
Removes the currently selected faction |
Interface Tab[]
The interface tab is for creation of the interface your players will use during game play. Placement of the chat windows, buff icons, radar maps, attributes bar etc are all placed in this interface.


|
Interface GUI and Options |
Effect |
|
Save Interface Layout |
Save the entire layout |
|
Game Screen Check Box |
Work in the Game Screen |
|
Inventory Check Box |
Work in the Inventory Screen |
|
Right Side Text Box |
Selection of which GUI to work on |
|
Component Settings – X position |
Change the X position of the selected GUI |
|
Component Settings – Y position |
Change the Y position of the selected GUI |
|
Component Settings – Width |
Change the Width of the GUI |
|
Component Settings – Height |
Change the Height of the GUI |
|
Component Settings – Red/Green/Blue |
Change the coloring of the GUI |
|
Component Settings – Alpha |
Change the amount of transparency of the GUI |
|
Chat Text area background Change/None |
Give the chat text area a back ground image |
|
Inventory window background change/none |
Give the inventory window a background image to use |
Items Tab[]
The Items Tab is for creating of all of the items, gear, weapons, treasure etc that are in the game. There are several sub tabs in this area that have specific effects to the items in the game.
Each item will be given a value, weight and set of attributes. It is also possible to restrict which race and class can use the item. Each item needs to be given an icon thumbnail image for its actual look when in side the players’ inventory.


|
Items Tab – GUI |
Effect of GUI |
|
New Item |
Create a new Item |
|
Delete Item |
Delete the current item from the game |
|
Save items |
Save all the Items in the game |
|
Current Item Pull Down |
Shows the current item that can be edited but also allows for selecting of another item |
|
Double Left Arrow |
Previous Item |
|
Double Right Arrow |
Next Item |
|
Items Tab – General Sub Tab – GUI |
Effect of GUI |
|
Item Name |
Name of the Item |
|
Item Type |
Type of the Actual Item (Weapon, Gem, etc) |
|
Value |
Value of the Item in Game |
|
Mass |
Weight of the Item |


|
Items Tab – Specific Sub Tab – GUI |
Effect of GUI |
|
Miscellaneous Data |
So that you can assign custom data to "other" type items, for scripting use |


|
Items Tab – Appearance Sub Tab – GUI |
Effect of GUI |
|
Change Button – Item Thumbnail Texture |
Change the Icon/Thumbnail for the Item |
|
Change Button – Item Mesh Male/Female |
Change how the item looks on the actual actor |
|
Gubbin Pull Down |
Select the Gubbin to be used |
|
Show this Gubbin…. Check Box |
Select the box if you wish to see the item on the actual actor |

|
Items Tab – Attributes Sub Tab – GUI |
Effect of GUI |
|
Attributes Text box |
Shows and allows selecting of the attributes given to the specific item |
|
Attribute Value |
Shows and allows for editing of the value given to the attribute for the specific item |


|
Items Tab – Other Sub Tab – GUI |
Effect of GUI |
|
Check Box – Item can be stacked |
Allows for stacking of the actual item |
|
Check Box – Item takes damage |
Selected for if the item can receive damage in combat |
|
Item Exclusive Race – Pull Down |
Select if the specific item is only usable by a specific race |
|
Item Exclusive Class – Pull Down |
Select if the specific item is only usable by a specific class |
|
Item Runs Script – Pull Down |
Run a specific script if the Item Thumb Nail is right clicked in game |
|
Function to start… - Pull Down |
Select the function to start up if the item is used |
Media Tab[]


The Media Tab, exactly like it sounds, is for all the media you will have access to when building your game levels. Meshes (Models), Textures, Sounds, and Music all are selectable from here for preview. Please note that all media that will be used in your game must be added to the media tab except textures for models, but everything else including textures for the terrain editor, models, music and sounds.
The top down pull down GUI option allows for quick selecting of the type of media you wish to view.
The full preview of the media type is shown here. This is how the actual media will be shown, or heard in the game. Perfect for making sure you are adding the correct media to your zone.
Other Tab[]
The others tab contains a few parts of the actual game design system that do not fit into the other tabs.
With this area you can select the URL where the update system for your game (NOT Realm Crafter) will look for updates as well as the IP or Host Name of the actual game server.
It also allows for setting of initial settings for players, such as money, creation of money, reputation, views (first person, third person or both) and if the portals are automatic when a player enters them. Account creation from the client as well as hiding the character name tags is determined here.
Particle Tab[]
The Particles Tab is the main tab for the graphical special effects that you can use and create for your game. You will notice that this tab has many GUI options for full editing and creation of your special effects. Throughout the GE and this document particles are referred to as emitters. Particles are the effects created by the actual emitters.
The preview window shows how the particle you are working on will look and react. This all happens in real time for quick editing and perfecting of a specific look. Below the preview window is a counter showing the number of active particles the particle is emitting. The higher the number the more CPU processing power is required.
The rest of the tab contains several GUI buttons, and GUI options to use in the creation of the particle effects from the emitter(s).
One good rule of thumb when working with the Particle Editor is to do small changes, because the effect may take a second or two before becoming noticeable.
|
GUI Button or Option Label |
Effect of Use |
|
Preview Texture |
Allows for viewing and selecting of the texture you wish to use in the actual particle effect. It is then loaded into the preview window. |
|
Reset Preview |
Resets the changes to the preview window to the default particle settings. |
|
GUI Button Up Arrow |
Rotate the camera view up |
|
GUI Button Down Arrow |
Rotate the camera view down |
|
GUI Button Left Arrow |
Rotate the camera view left |
|
GUI Button Right Arrow |
Rotate the camera view right |
|
GUI Button Plus |
Zoom the camera in |
|
GUI Button Minus |
Zoom the camera out |
|
Current Emitter Pull Down |
Change to a saved particle effect |
|
New Emitter |
Create a New Effect |
|
Save Emitters |
Save the Emitter |
|
Delete Emitter |
Remove the Emitter from RC Engine and your hard disk |
|
General Option – Max Particle |
Select the maximum particles that can be generated, the actual amount generated maybe less |
|
General Option – Spawn Rate |
Sets the speed of the particle formation rate |
|
General Option – Particle Lifespan |
Sets how long the actual particles will be visible. |
|
General Option – Initial Size |
Sets the scale of the particle when first created |
|
General Option – Size Change |
Allows for changing the actual size of the particle during its lifespan |
|
General Option – Blend Mode |
Sets the transparency effect of the particle |
|
General Option – Initial Alpha |
Sets its initial Alpha setting (transparency) |
|
General Option – Alpha Change |
Sets how the particle will change its transparency setting throughout its lifespan |
| Colouring - Initial Red | Set the colouring of the particles starting color 255 default |
| Colouring - Initial Green | Set the colouring of the particles starting color 255 default |
| Colouring - Initial Blue | Set the colouring of the particles starting color 255 default |
| Colouring - Red Change | Set the colouring change of the particles 0.0 is default |
| Colouring - Green Change | Set the colouring change of the particles 0.0 is default |
| Colouring - Blue Change | Set the colouring change of the particles 0.0 is default |
|
Animated Texture – Frames Across |
Sets the number of actual frames to produce from the start of the actual particle during animation horizontally |
|
Animated Texture – Frames Down |
Sets the number of actual frames to produce from the start of the actual particle during animation vertically |
|
Animated Texture – Animation Speed |
Sets the speed of the animation for the animated particle |
|
Animated Texture – Start on Random Frame check box |
Select if the particle will start on a unique frame each time. Allows for a different look each time the particle effect is used. |
|
Shape Options – Emitter Shape |
Changes the shape of the particles, this will change the actual look of the emitter. |
|
Shape Options - Cylinder Axis |
Changes which of the Axis the Cylinder Emitter Shape uses. X, Y, or Z |
|
Shape Options – Width |
Changes the Width of the Emitter Shape |
|
Shape Options – Height |
Changes the Height of the Emitter Shape |
|
Shape Options – Depth |
Changes the actual width/depth of the Emitter shape |
|
Shape Option – Inner Radius |
Changes the minimum size the emitter will show |
|
Shape Option – Outer Radius |
Changes the maximum size the emitter will show |
|
Velocity Shaping – Pull Down Box |
Dictates whether the emitter is confined to a specific area |
|
Velocity Shaping – X Velocity |
Changes the X axis velocity with shaping |
|
Velocity Shaping – Y Velocity |
Changes the Y axis velocity with shaping |
|
Velocity Shaping – Z Velocity |
Changes the Z axis velocity with shaping |
|
Velocity Shaping – X Random |
Uses random values to affect the X axis with shaping |
|
Velocity Shaping – Y Random |
Uses random values to affect the Y axis with shaping |
|
Velocity Shaping – Z Random |
Uses random values to affect the Z axis with shaping |
|
Velocity Shaping – X Force |
Dictates the force along the X axis particles will be affected by |
|
Velocity Shaping – Y Force |
Dictates the force along the Y axis particles will be affected by |
|
Velocity Shaping – Z Force |
Dictates the force along the Z axis particles will be affected by |
| Forces - Force Shaping | Set the shape of the force on the particles |
| Forces - X Force | Set the amount of force on the particle |
| Forces - Y Force | Set the amount of force on the particle |
| Forces - Z Force | Set the amount of force on the particle |
| Forces - X Force modifier | Set the amount of modification on the force |
| Forces - Y Force modifier | Set the amount of modification on the force |
| Forces - Z Force modifier | Set the amount of modification on the force |
Project Tab[]
The Project Tab is the first tab. There are four GUI buttons in this tab, labeled Build Full Client, Build Minimum Client, Generate Client Update and Build Full Server.
Each button does exactly what it says. Build Full Client builds the full client into the install directory in the projects folder in the Realm Crafter directory. This is the actual client you will distribute to your players.
Build Minimum Client only generates the actual program to distribute a very small client which will require a full patch off the patch server.
Generate Client Update allows for creation of small update features for your players to download. These updates are the actual media and mechanic changes to the game - Just like a normal MMORPG game update.
Build Full Server, builds the actual server program (for windows only at this time), which you run on your server computer. This interacts with the MySQL database or the flat file database and allows for connection by players.


When you build your Full Server and Full / Minimum Client they enter your /Game and /Server directories in your /Realmcrafter/project-name directory. Copy your entire server directory to your server. It is also best to ZIP (compress) your /Game folder when you distribute your game client.
See the server section to see how to set up a server.
Projectiles Tab[]
Projectiles Tab contains all the information for the projectiles used in the game, from spells and arrows to bullets and missiles. It is here you set up the overall look of the projectile, how it acts during combat, its damage mechanics and more.
Since the potential for a large number of similar projectiles is more then possible, the ability to copy the current projectile to a copy of itself has been added.
Projectiles are another section where knowledge of your in game mechanics is something that should be decided upon before creating. It is very easy to edit your projectiles in any case.


|
Projectiles GUI Button or Option |
Affect on Projectiles |
|
New Projectile |
Clears the Projectile settings |
|
Copy Projectile |
Copies the projectile and creates a copy projectile named Copy of (original name) |
|
Delete Projectile |
Deletes the selected projectile |
|
Save Projectiles |
Saves ALL the projectiles |
|
Current Projectile Pull Down Box |
Select a projectile already in the game |
|
Double Left Arrow |
Change to the previous projectile |
|
Double Right Arrow |
Change to the next projectile |
|
Projectile Properties – Name |
Name of the actual projectile |
|
Projectile Properties – Mesh |
Use a mesh (3d Model) for the projectile |
|
Projectile Properties – Mesh Button – Change |
Change the Mesh from None to a mesh |
|
Projectile Properties – Mesh Button – None |
No Mesh will be used with this actual projectile |
|
Projectile Properties – Emitter 1/2 – Pull Down Box |
Select the Emitter effect you wish to use with this spell |
|
Projectile Properties – Emitter Texture – Change Button |
Change the texture you wish to use with the actual emitter |
|
Projectile Properties – Projectile homes in on target – Box |
Selected the projectile will move towards the target selected in game |
|
Projectile Properties – Chance to Hit |
Selects the percentage of chance for the projectile to hit the target |
|
Projectile Properties – Damage |
Gives the damage of the projectile when it strikes a target |
|
Projectile Properties – Damage type |
Changes the Damage type if the projectile inflicts a specific damage type such as fire or ice |
|
Projectile Properties – Movement Speed |
Gives the movement speed of the projectile |
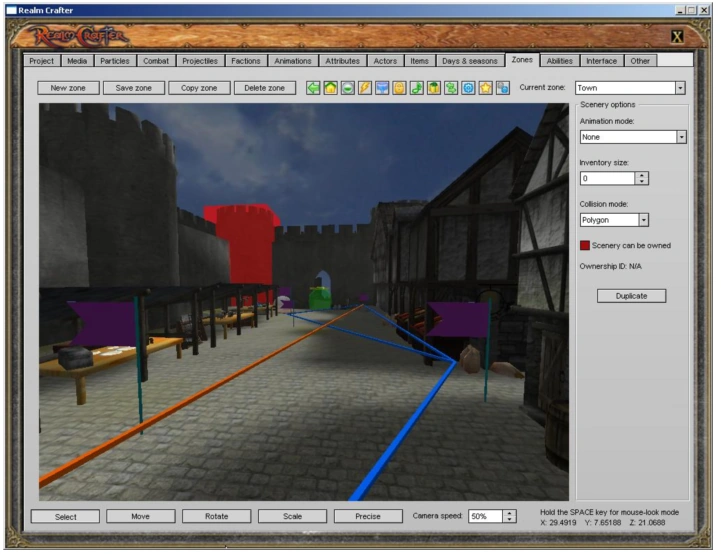
Zones Tab[]
For more documentation on the Zones Tab, go to the Zones Tab wiki page.

The Zones Tab is the actual “meat and potatoes” of the entire Realm Crafter Engine. This is where you can place the terrain, scenery (trees, buildings), change weather, add water, lava, particle effects, sounds, music, player zone in portals and much more.
The GUI interface for the Zones Tab surrounds the preview / work window. The GUI controls are fairly straight forward, even though there are a large amount of changes that happen with in the window depending on which part of the zone you are working with.